Tuesday 24 April 2018

Holy Hovering Dynamite Batman!

Riddler and his fiendish clones have given an army of Batmen a tricky puzzle to solve!


I've been working on my Minifigure Mosiac script so that I can use the colours in the original image design for the mosiac to assign different models and parts to create the structure of the mosiac.  So this batman and riddlers and dynamite mosiac was created using the following image template where...

Black and Cyan = Batman
Yellow = Dynamite
Grey = Riddler
Green is ignored currently

I also added a slight random scatter to the dynamite - otherwise it looked too ordered.

At the moment I have to manually assign each model to a colour in the original image and rework the script by hand, which is fairly painful so I'm currently working on a mechanism for getting the average colour of the minifigures (when viewed from the top).

Wednesday 18 April 2018

SBrick Plus Arrived

I ordered a couple of SBrick Plus's recently from the SBrick website - they took a while to arrive (from Hungary) but these control bricks get good reviews and unlike some other designs they can easily swapped out for the standard LEGO IR receivers in existing models; but unlike the LEGO IR receivers which can only power two Power Function motors , the SBrick can control up to 4 motors (or sensors).


As I do a lot of my testing on the train and I didn't want to lug around a 9V Lego battery pack so I then purchased a USB to 2.1mm DC Booster Cable from here which converts USB 5V to 9V, which is what a LEGO battery pack generates, and also what the SBrick wants to receive by way of power.  


 I cut the end of the 9V cable off and wired it to a LEGO Power functions extension cable using a terminal block - finally I buried the terminal blocks into a 4x2 Lego brick (where I pulled out the internal supports and glued a 4x2 plate on the bottom to seal it all in!


So now I'm ready to start testing my SBrick whenever I have my laptop with me! 

Here's my final cable - USB to 9v Power Functions connector...


Wednesday 11 April 2018

Colour Minifigure Mosiac - Sneak Peek!

I'm now working on adding colour support to my Minifigure Mosiac system - here's a sneak peak...

There's still quite a bit of work to do but as soon as I have more I'll share it here...

Thursday 5 April 2018

I'm Batman...No, I'm Batman...NO, I'm Batman....

I reworked my Minifigure Mosaic script to deal with the problems with the hands - if I'm honest it's a bit of fudge - the script now watches for part 3820.dat (which are the hands) and applies a 45 degree rotation in the Y axis - the hands are also re-positioned slightly father apart by the script - I still don't know why, so I moved them closer together in the library model - it works (in respect that I don't have to fix all the hands in excel but it still needs some more work).  The problem definately lies in the way the rotational matrix is processed.  I'll keep digging.

Here's a Batman Minifigure mosiac (I added a tiny bit of disco lighting - well it's Batman!)...


Wednesday 4 April 2018

Creating Building Instruction Documents For A LEGO Remote Controlled Car (PART 2)

Having built my model of my simple LEGO remote control car I now needed to create the documentation.


I've tried a number of documentation tools for LEGO instructions and the instructions that get created directly from Lego Digital Designer are fairly good (and they look a lot like real Lego instructions) but you don't get any control over how those instructions are generated or the order of the steps - LDD works all this out for you.  However I was using LDCAD to build my model and I needed instructions for a partial build so I was going to have to use something else.  In the end I settled on Trevor Sandy's LPub3D but before I could use LPub3D I needed to add "steps" to my model.  Steps allow you to break your model into...er...steps!  So that you can specify the order in which you want your LEGO model to be built.  LDCAD allow you assign different part to different steps.

I'm still a novice with using steps in LDCAD but I managed to break my model up into 13 steps you can see a video of my steps below.


Note that I didn't start with just one or two bricks - my actual physical models will be partially built so Step 1 starts with with the base of the partial build.  Having completed my steps in LDCAD, I could then load my LDR file into LPub3D.


LPub3D reads the LDR data and the step data and presents your LDRAW model as an instruction document.  The defaults that LPub33D provides are pretty good, I made some adjustments to some of the LPub3D settings but they don't need a lot of adjusting - the main issue is moving elements around on a page - you sort of expect drag and drop but each page element is locked to a grid on the page (or locked to other elements on the page) so getting the exact layout you want can be challenging, but in the end I go the output I wanted.


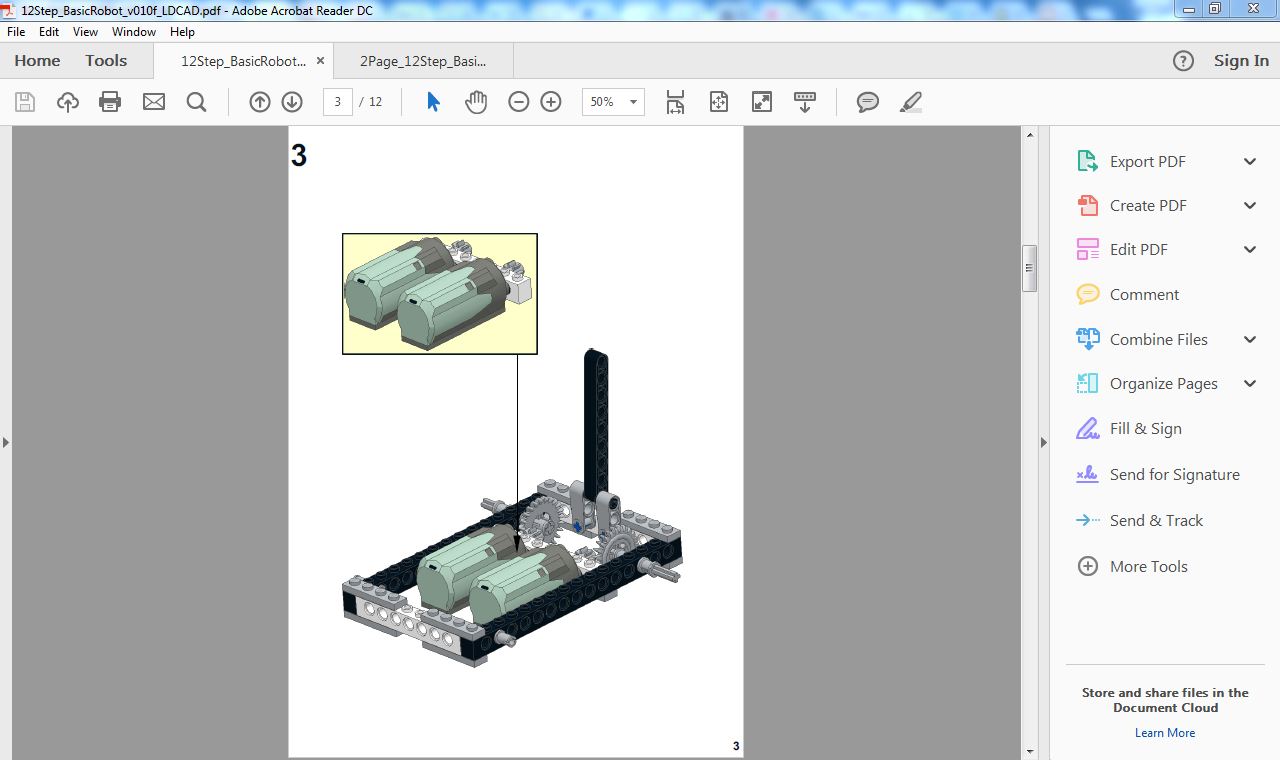
The motor mount "drop-in" (Page 3) is created using an mpd sub-model in LDCAD.   Again I'm fairly new at mpd files but LDCAD allows for the separation of certain model elements into sub files - These files are then treated as individual sub builds with break out instructions when the file is loaded into LPub3D.  You can also add text and image elements to your instructions (the image files support 32bit png files with transparency so that you can overlay images over your models).  The only thing that would be great in LPub3D are probably some basic arrow and circle tools to highlight certain objects and elements.

Once you're happy with the layout of your instructions LPub3D allows you to create a PDF file that you can use to print out your instructions.The last thing I needed to do was to try to squash the instructions so that it only used 1 sheet of paper (as opposed to 12 sheets of paper).  To do this I simply used the multipage print option in Adobe Acrobat Reader to layout 6 pages per page and then print it double sided.


 Now I had all my instructions on a single sheet ready to go for my plastic Robot Wars experience!

Here's the pdf instructions

And the ldr file...