Saturday, 9 April 2022

The Chalybeate Spring - The Pantiles (Part 4)

There are a number of tools for creating decals for ldr files.  

http://www.melkert.net/test/stickerGen.html

https://github.com/nilsschmidt1337/ldparteditor/wiki

http://www.scottwardlaw.com/sticker_generator/

But I struggled to find one that would allow for seamless transfer of stickers between LDCAD, Studio, and Blender.  Consequenly I ended up using svg2ldraw

http://c-mt.dk/software/svg2ldraw/

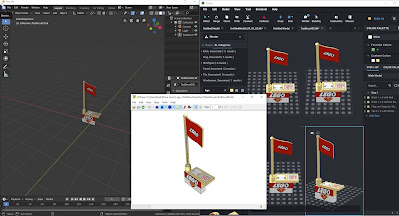
For me svg2ldraw works well but it requires a fairly detailed understanding of vector graphics.  I was using an old copy of Illustrator CS2(!) to manipulate the original vector artwork (but Inkscape may also work).  svg2ldraw allows you to remap colours into Lego colours (including transparency) which allows for separation of colour elements from the background when placing the sticker in Ldraw.  The image below shows the original design in Illustrator, the sticker in LDraw and the final render in Studio.


Although the construction of a logo is relatively straight forward (although it still took me a few hours to figure out!) dealing with large blocks text turned out to be a lot more complicated.  


Unfortunately the svg2ldraw converter does not seem to read compound paths in the same way as Illustrator so all the compound paths need to be converted to simple paths - this can be especially tricky when working with letters with any "holes" in them (like O P B A R D etc) which will be converted to compound paths in Illustrator - each of the "holes" will need cleaning up separately - which can take a lot of time!.


Friday, 4 March 2022

The Chalybeate Spring - The Pantiles (Part 3)

Stickers, as it turns out, remain complex and time consuming in LDRAW - in the past I’ve used image files which you can embed (as a reference link to the image file) in the LDRAW dat file - these can be useful when working with image reference planes in LDCAD - however it turns out neither Studio nor Blender could read these images files when they are linked in a .dat file - Now I realise, of course, that I could add all the stickers and decals directly in Blender once the LDRAW model brick elements were complete (and I might do next time!). However I wanted to find the solution that allowed LDRAW models to move seamlessly between LDCAD, Studio and Blender - as many LDRAW parts have stickers and decals on them that appear in all packages there is clearly a solution. 


Wednesday, 16 February 2022

The Chalybeate Spring - The Pantiles (Part 2)

The last build I did with custom stickers celebrated Will Bayley’s Paralympic gold medal victory back in 2016 - I’d built the model of Will’s celebration antics in Lego Digital Designer and the stickers and decals were created using numerous guides and tips from the internet. I remember it was a complicated process! This time I was building using LDRAW components in LDCAD and I planned to render in Studio (‘’cos it’s relatively easy to get a nice rendered image out!). I still much prefer to build in LDCAD as opposed to Studio so I needed to make sure that any stickers I created would transfer between LDCAD and Studio - as I discovered it still isn’t easy to make easily transferable stickers in LDRAW!


Sunday, 30 January 2022

The Chalybeate Spring - The Pantiles (Part 1)

 I’ve been working on a new architectural model for a couple of months and I wanted to create the stickers for a number of elements. The model is based on the Chalybeate Spring part of The Pantiles, an historic street in Tunbridge Wells - The initial build took a couple of weeks and I created everything initially just using white bricks. The next step would be to add all the stickers - this would turn out to be a lot more complicated than I imagined!


Saturday, 4 December 2021

Heath Robinson in Real Lego (Part 4)

 You can now see the final model on display at the Heath Robinson Museum.  The museum is definitely worth a visit if you find yourself in that part of west London!


Wednesday, 17 November 2021

Heath Robinson In Real Lego (Part 3)

Building the final model took longer than I expected and although I needed to make a number of adjustments between the original digital model and the new real Lego one I was very pleased with the result.  I felt the final build still paid tribute to both Heath Robinson's original design and my digital model.  It was great experience going from digital model to physical model for such a complex and delicate build.


Wednesday, 10 November 2021

Heath Robinson In Real Lego (Part 2)

One of the things that I felt was important about building a real Lego model of one of Heath Robinson's designs was that it actually worked!  Manging the rubber bands and connections between the various elements turned out to be much more challenging that I expected.  There was a lot of trial and error with the placement of various elements, wheels and cogs.  Plus I also added a crank handle so that you could more easily operate the model.  


Here's a short video showing the mechanism working during the build process.