Sunday 16 December 2018

Binvox 2 LDR (Part 3)

So here's my binvox to ldr converter with brick optimistation and layer rotation (to add strength to the resulting model).  You need python 2.7 and numpy installed - unzip the archive and it should run from the resulting folder - there is a binvox file (moo.binvox) for testing which the code will use by default and the binvox rw file (which my code calls to read the binvox binary).

https://drive.google.com/file/d/1ypVxLItw2attg6j1iMsJdyPzdEVRDDYk/view?usp=sharing

You can use it using the following line in the cmd window

"C:\path\binvox2ldr.py" "C:\path\myfile.binvox"

Here's what you should end up with if you run the code without your own binvox file - the code also adds a STEP for each layer of the model.


Currently all the output is grey - coloured bricks will require an alternative solution as binvox does not support colour (that I can access anyway) - I'm looking a Goxel, which I think should work (http://guillaumechereau.github.io/goxel/) but it will probably be the New Year before I get back to this now.

If you are making your own binvox files (from .obj's) I sugest using the:  -d 32 -rotx parameters during the conversions as this makes a relatively small model and rotates the obj so the bricks are pointing upwards (well it works for me anyway!)

Here are some more of my model conversions....


Tuesday 11 December 2018

Binvox 2 LDR (Part 2)

Using the binvox python parser allows relatively easy access to each voxel layer slice in the binvox file - once a voxel slice is transferred to a numpy matrix it's then possible to translate each voxel into a single 1x1 Lego brick...


I've included the code to do this here but as I've noted previously a 1x1 brick model isn't much good if you want to actually build a physical representation of the 3D object in question - you need to optimise the voxel matrix for each slice of the model into larger bricks;  and there is a Perl script to do just that here.  This Perl script optimises the voxel slice grouping individual voxels into larger Lego bricks - Exactly what I needed to do in a python script!

One of the disadvantages of this Perl script is that it does not add a strengthening element for each layer in the voxel matrix (so each layer is simply build on the layer below often using similar bricks) which is something that had been raised at London AFOLs, consequently I thought it would be good to try to add some strength to model by rotating each layer at 90 degree's to each other during the translation of voxels to bricks - this would automatically add a degree of strength to any subsequent build.  The other disadvantage with the Perl script is that you have to go through an intermediary text file before you can process the binvox file - it's not a major problem but it would be nice to try to get everything done in one go from binvox to LDR.

Saturday 1 December 2018

Binvox 2 LDR (Part 1)

Following a discussion at our last London AFOL meetup, I've taken a slight diversion to look at creating ldr files from binvox files - Binvox is a small program that voxelises 3D files (like .obj) into a voxel model.  Binvox is a good solution for transferring 3D models into games like Minecraft and I used it a while back to help create a simple animation system in Minecraft (a long time ago!)


Binvox to Minecraft translation is relatively straight-forwards as nearly all Minecraft's main components can be considered as a single voxel element.

Binvox to Lego presents an additional challenge as Lego doesn't really work if you translate each voxel to 1x1 brick as the resulting physical model (if you tried to build it) will simply fall apart.  There is already a mechanism to go from Binvox to Ldr here using a Perl script.  This script is a two stage process requiring you to convert the binvox file to a txt file so that Perl can parse the txt file but this Perl script adds an important element for Lego in that it optimises the voxel matrix for each layer into larger Lego bricks, so that you are not simply building with 1x1 bricks.

This Perl scripts works (and is probably one of the easiest Perl scripts to read that I've ever encountered!) but I wanted to see if I could bypass the requirement to translate the binvox file to txt and also add some strength to the model by rotating layers at right angles to each other.  I also wanted to code it in Python, as my Perl is rustier that a rusty nail that has been left in a jar of salt water for 10 years (which is also how long it's been since I've written any Perl!).

My starting point was this Binvox python parser which would take the hard work out of having to deconstruct structure of the binvox file.  With this is should be relatively easy to convert Binvox direct into LDR files...


Monday 5 November 2018

Brickalo - Modo Command Line file

A number of people have asked about using MODO command line to render LDraw .ldr files.  Links to Modo and the LDR importer for MODO are in the footer of the Brickalo site.  Modo is a free 30 day download from The Foundry - MODO_CL (Modo command line) will continue to work after the 30 day trial expires.  The LDR importer for Modo is donationware (and well worth a donation!).

My previous posts about using Modo are here...
https://cultofthebrick.blogspot.com/2018/03/modo-and-ldraw-part-1.html
https://cultofthebrick.blogspot.com/2018/03/modo-and-ldraw-part-2.html
https://cultofthebrick.blogspot.com/2018/03/modo-and-ldraw-part-3.html

I'm primarily using Windows but the principle should work on a Mac (but you will need to change the paths) - as far as I'm aware there is no LDraw>Modo plugin for Linux.

I've included the command line script below - or you can download the zip file containing the script and sample brickalo ldr file from here

To execute the command line in a cmd window your command line should look something like this...


Command line documentation for MODO can be hard to find and this may not be the best way to implement ldr rendering but it works for my requirements.  Remember that the camera placement noted in this script moves the camera to frame a Rainbow Lego Tower on Brickalo - for your model it will be different!   Also the camera target (where the camera looks at) will also likely be different.  I found controlling the camera framing and the camera target using ModoCL hard - I've spent quite a bit of time trying to convert a POVray camera to a Modo camera but to date I've not succeeded working out the maths to do the conversion reliably.

Create a "brickalo" folder in your home directory then either download the zip file above or create a file called brickalo.txt and copy and paste the code below (and you'll need your own myLegoFile.ldr too)...

#======================================================================================================================================
# BRICKALO MODO RENDER BY NEIL MARSDEN 2018
#Make sure both MODO and the LDRAW Plugin for Modo is installed
#Currently an LDRAW folder needs to be in C:\LDRAW Modo_CL does not see the LDRAW location set for the plugin in Modo
#But you still need to load the config file so that Modo_CL knows where the LDRAW plug-in is

#In the comand window copy and paste the following line - BUT MAKE SURE YOU CHANGE UserName to your UserName so mine would be "C:\Users\Neil\brickalo\brickalo.txt"
#"C:\Program Files\Foundry\Modo\11.2v2\modo_cl.exe" -config "C:\Users\UserName\AppData\Roaming\Luxology\MODO11.2.CFG" < "C:\Users\UserName\brickalo\brickalo.txt"

#Lots of people have this at the start of their modo scripts!
log.toConsole true
log.toConsoleRolling true
#=========  Open LDR File ==========
scene.open "C:\Users\UserName\brickalo\myLegoFile.ldr"
#=========  Move the Camera ==========
camera.transformTo Camera -0.228601471 1.172085693 -0.844499451 0 0 0 
#========= Create Mesh - this will be the camera target ==========
item.create mesh
item.name "cameraTarget"
transform.channel pos.X 0 
transform.channel pos.Y 0.175 
transform.channel pos.Z 0 
#========= Target Camera ==========
#Select the Camera then the Mesh then point the camera at the Mesh
select.subItem Camera set
select.subItem cameraTarget add
target set
#Changes the field of view (zoom)
camera.hfov 22
#========= Start Image Render ==========
select.Item Render
item.channel step 1
item.channel first 1
item.channel last 1
item.channel outPat "_<FFFF>"
#========= Render HD Landscape Resolution ==========
render.res 0 1920
render.res 1 1080
#========= Output the images BUT MAKE SURE YOU CHANGE UserName to your UserName! ==========
render.animation "C:\Users\UserName\brickalo\OutputImage" PNG
#========== Or render a turnaround animation - rem out the previous line and use this next line instead (remove the hashtag) - BUT MAKE SURE YOU CHANGE UserName to your UserName! ==========
#render.turntable "C:\Users\UserName\brickalo\OutputMovie.mp4" pyFFMPEGMP4 24 12.0 0
#WORKS?!

Sunday 4 November 2018

Playing Lego With Python - www.brickalo.com

So I've taken a break from developing the python code for tracking and adding Lego bricks to an .ldr model file so that I could turn my current code into a website which would help to display some of the ideas that I've been working on.   The result is www.brickalo.com


I've tweaked the colour allocation of bricks so that it creates a "rainbow" effect as the bricks are added to the pile and I've used some of the other work I've done in Modo to create a command line renderer for each Lego pile so that you end up with a pretty picture of your pile of Lego - I used Mobirise to create the basic bootstrap website - Mobirise is free and allows you to create a static bootstrap website really quickly and easily but I then had to switch to PHP to create the dynamic code for the website (the "WOW BRICKALO" gallery section on the home page and the timeline elements on the Archive page).  Working in PHP was slightly weird having spent so long in Python, but the main structures are similar so coding the dynamic elements was not too complex. 


The whole site is hosted on Amazon's AWS free tier and whilst in isolation www.brickalo.com might seem a bit weird; as a method of displaying the work I've done - mostly on my commute to and from work over the last nine months, I feel it works well and I'm really pleased that it's drawn together a number of different strands that I've been working on over the last year.

Saturday 3 November 2018

Playing Lego With Python - Pile 'Em High...

With the Build Matrix now functioning correctly I could increase the number of bricks that I could add to my pile hopefully without experiencing any intersections.  I set the total number of bricks to 100 and pressed "Go"...


Not too bad!  Analysing the model I was fairly certain it was a valid model - that is, that every brick was connected to another brick by at least one stud and there were no intersections or "floaters" (bricks that hung in space and were not connected to any other brick).  If I imported my model into Lego Digital Designer (LDD) - LDD would generate an error and tell me how many bricks were incorrectly placed...My Lego tower imported into LDD with no errors - so I created a couple more towers and imported those too...


LDD reported no errors for any of the piles (phew!) - it looks like the changes I made to the build matrix seem to be working.


Having created a mechanism for adding a variety of Lego bricks to a model in a valid (if somewhat unstable configuration) could I now get the code to start to create more visually interesting models and designs.  


Friday 2 November 2018

Playing Lego With Python - Improving The Build Matrix

Managing the addition of both rotated bricks and "odd" bricks like 1x2 and 2x3 required me to rework the "Build Matrix" that I use to track the placement of bricks as they added to the ldr file.


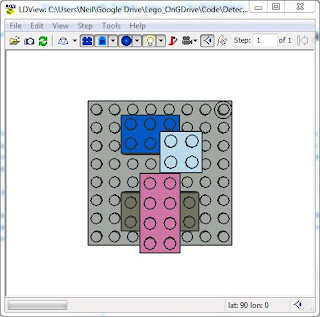
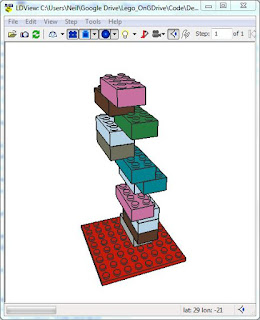
You can see the build matrix in the image above on the left (along with the ldr file and the ldview image.  This tracks each brick as it's added to the .ldr file and calculates the studs and dimensions of the bricks.  This allows the code to track the placement of each brick as it's added to both the .ldr file and the build matrix. 

I also re-orientated the build matrix so that it matched the top view - this is where the single red stud buried in the top right hand corner of the model became important as it provided a reference point on model that I could match to the matrix - and the stud is buried in the plate so as not to effect the actual build matrix itself.


The problem I had was in the mechanism I used to calculate the addition of the new part to the build matrix - once I had reworked that calculation, the build now matrix accurately reflects the placement of bricks in the ldr file.  However, if you look carefully at the build matrix you can spot that the build matrix only works by moving the bricks up in height (look at the matrix values for the bottom two "floating" pink studs) - there is currently no option to "back-fill" into holes.  This should be possible by combining the build matrix and the data stored in the ldr file so that you could also map the "holes" between bricks that might exist in a model.


With the build matrix now accurately reflecting the addition of parts which had been rotated, or were "odd" bricks (or both!) I could now consider building much taller towers hopefully without any placement errors.


Thursday 1 November 2018

Playing Lego With Python - Rotating Bricks During The Build


Whilst brick rotation is relatively straight forwards (by modifying the rotation matrix for each brick in the ldr file) tracking the corresponding rotation in my build matrix (which tracks brick dimensions and stud availability of bricks in the pile) is complex.  As you rotate the brick you have to rotate and reshape the brick matrix by the same amount.


Although the Lego piles were increasingly "correct", that is to say that any new bricks sat on top an existing stud if one was available in its proposed position there were still occasional problems in the build matrix.  I realised the problems seemed to limited to specific bricks (mainly "odd" flavour bricks like 1x2 and 2x3 bricks and plates) - the placement of these "odd" bricks is trickier as the origin point of the bricks in ldr brick placement does not place "odd" bricks on a stud by default, so they immediately need moving to sit on a stud.  This initial move and any subsequent move needs to be tracked in the build matrix and then also tracked when these bricks were rotated.


Consequently I've had to learn a lot about matrix manipulation!

Tuesday 2 October 2018

Playing Lego With Python - Building More Complex Brick Piles


I'm  now adding increasing  variety and number of bricks to my brick piles - I have included both bricks and plates and the bricks currently remain the "even" flavour of bricks - so 2x2, 2x4 etc.


The problem now is the orientation of the all bricks - they are all pointing in the same direction.  So now I need to think about rotating the bricks...


Monday 17 September 2018

Playing Lego With Python - Adding More Brick Shapes

I've stated to add other Lego parts to my models - particulaly asymetrical bricks, both bricks and plates, which are more difficult for my code to process and understand.  I now can now build towers with a variety of bricks.


But there are still some issues with brick placement!


Wednesday 5 September 2018

Playing Lego With Python - High Hopes!

I updated my build tracking matrix to better monitor the position of the bricks being added to the LDR file - it's not perfect but I've reduced the intersecting bricks down to about 4% - Here's a build with about 55 bricks - LDD told me there were 2 intersections (you can just see one of them at the base).  I underestimated the importance of the build tracking matrix when I started this project - I probably need to go back an rework it!


Thursday 30 August 2018

Playing Lego With Python - Can Computers Play With Lego?

I've been working on some code to allow Python to "understand" the structure of LEGO bricks. In LDRAW, the actual LDR file contains each brick used in a given LEGO model (the .ldr file contains information about the colour, position, and orientation of a given brick). By drilling down into the individual structure of a given brick (by analysing the sub part dat files that create each brick) I could get python to understand the dimensions of the brick and the number of studs that a brick has. Using this information I could then begin to place bricks and get the code to place subsequent bricks with an understanding of the bricks that might already exist on the model. Remember that the ldr file of the model itself doesn't contain information about the dimensions of the brick or the stud count of the bricks, so my python code has to work this out for itself. When the code places a subsequent brick it has to make sure that it doesn't intersect with any existing bricks already in the model. Currently I'm simply using 2x2 standard bricks - these are by far the easiest to initially manipulate in code as they are symmetrical, but ultimately I'd like my code to manipulate a range of bricks perhaps around 10 different bricks - this may seem small but the possible model combinations using 10 bricks would run into the billions! Currently the code displaces any new bricks in height (Z) when it encounters an existing brick (as this is easier than displacing left right in X and Y!) 


Tracking the existing bricks (and their dimensions) during the build remains challenging and whilst it generally works there are still instances where the code misplaces a LEGO brick causing an intersection. These intersections - and occasional "floaters" (where a brick seems to hang unsupported) still require additional debugging. I also deliberately embed a red stud in the base plate for orientation purposes (if you were wondering what that was!) 


There is no "intelligence" here so this is definitely not an AI or any type of machine learning, but if I could get some code to understand the "structure" of LEGO bricks it might be possible to to use this code as the basis for an AI experiment, where it might be possible to build and analyse 1000's of lego models very quickly and select those that might be more "appealing" than others - any kind of AI or ML is a considerable way off for me currently but if anyone in interested in exploring the idea of a model building LEGO AI please get in touch info@cultofthebrick.co.uk

Thursday 12 July 2018

Animating the Professor's Invention in MODO (Part 2)

Having started to explore the animation tools in MODO I wondered if I could actually animate some of the elements of the model itself?  Animation in MODO is based around a reasonably standard timeline/key-frame analogy and after some hit and miss attempts to get elements to rotate I finally figured out how to set key-frames at the start and end of the sequence and modify the rotational properties of the elements.  All the objects that I selected initially seemed to have their centre points correctly placed which was a big help.   I added a couple of keyframes to the camera to ping/pong the camera during the sequence.   I had to remove the ice-cream lolly pedals from the small gears on the left - as I would have had to build a hierarchy of elements to rotate these pedals correctly and I wasn't able to animate the belts, that would have been seriously complex, but with all the wheels rotating there is "perception" that the belts seem to be driving them and I felt the result was reasonable for a first attempt.


Wednesday 4 July 2018

Animating the Professor's Invention in MODO (Part 1)

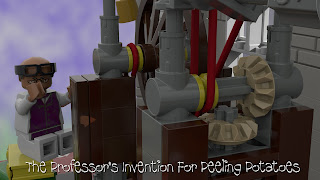
I've been starting to experiment with animation in MODO.  As MODO provides a full modelling and animation system, in addition to simply rendering LDRAW models I wanted to see what the options were for animating digital Lego models using MODO.  My first attempt was a relatively simply turnaround of my "Professor's Invention For Peeling Potatoes" model that I'd added to Lego Ideas.


Modo supports both Orbiting Camera and Spinning Geometry but whenever I've tried to use spinning geometry many of the Lego elements seem to disappear (and this seems irrespective of the LDRAW model you import) - it's possible that I'm misunderstanding something about the spinning geometry settings so at the moment my only option seems to be Orbiting Camera. 


It's important to remember to set the camera target though as otherwise the camera orbit can seem very odd.  You can use the "Set Target" option in Camera properties to fix the camera on part of the model as it rotates so that the camera view remains locked on the part of the model during the rotation.


This is fairly easy way to create a rendered turnaround of an LDRAW model using MODO.

Saturday 9 June 2018

More Drawing Style Rendering

Here's another drawing style rendering that I quite like, combining the 3D geometry with monochrome shading with Trace Edges from Adobe Illustrator


Friday 8 June 2018

The Professor In SketchUp

I thought I would try and put my "Professor's Invention For Peeling Potatoes" MOC through SketchUp to try to get a more pencil render look - which might better match Heath Robinson's original black and white drawings - in the end I had to export the Collada models for SketchUp from Modo as the original process I outlined in my previous post seemed not to export the flexible components - After some experimentation, I was quite please the with output.  You can see the initial images below...


Thursday 7 June 2018

The Professor's Invention For Peeling Potatoes

I've spent the last month working on a new Lego Ideas MOC "The Professor's Invention For Peeling Potatoes".  See it here on Lego Ideas  I've always enjoyed Heath Robinson's designs and illustrations and I don't often see pulleys, strings and rubber bands in Lego model designs so I wanted to create a Lego set that incorporated some of these more flexible components.  Heath Robinson's illustrations would seem an ideal starting point for incorporating some of these flexible elements.  Here's Heath Robinson's original illustration...


 The model was created in LDCAD (http://www.melkert.net/LDCad) over a period of about a month and the final model was rendered in The Foundry's Modo software (https://www.foundry.com/products/modo) using Eric Soulvie's LDRAW importer plugin (https://www.battlefleet.net/fmtldr/).


LDCAD provides a relatively straightforwards way of using flexible parts and as I've noted in this blog previously Modo's "out the box" rendering is particularly effective when using a variety of different textures and materials in a Lego model.  Although I did discover that Modo won't read custom LDRAW stickers (which isn't a huge surprise) and it's fairly easy to create the sticker in Modo as a texture on a plane.


Creating a functional pedal system at Minifigure(ish) scale was challenging but the ice lollies and small cogs should be able to drive the rest of the mechanism.  The model should be fully functional but like the professor I'm not sure how effective it would be at peeling potatoes (or 1x1 Lego studs!)

You can find out more about Professor Branestawm here https://en.wikipedia.org/wiki/Professor_Branestawm
The original illustration that inspired this model is here http://www.cgsociety.org/cgsarchive/challenge/entries/18/13467/13467_118388...
And more about the life and work of William Heath Robinson can be found here https://www.heathrobinsonmuseum.org