Monday, 5 November 2018

Brickalo - Modo Command Line file

A number of people have asked about using MODO command line to render LDraw .ldr files.  Links to Modo and the LDR importer for MODO are in the footer of the Brickalo site.  Modo is a free 30 day download from The Foundry - MODO_CL (Modo command line) will continue to work after the 30 day trial expires.  The LDR importer for Modo is donationware (and well worth a donation!).

My previous posts about using Modo are here...
https://cultofthebrick.blogspot.com/2018/03/modo-and-ldraw-part-1.html
https://cultofthebrick.blogspot.com/2018/03/modo-and-ldraw-part-2.html
https://cultofthebrick.blogspot.com/2018/03/modo-and-ldraw-part-3.html

I'm primarily using Windows but the principle should work on a Mac (but you will need to change the paths) - as far as I'm aware there is no LDraw>Modo plugin for Linux.

I've included the command line script below - or you can download the zip file containing the script and sample brickalo ldr file from here

To execute the command line in a cmd window your command line should look something like this...


Command line documentation for MODO can be hard to find and this may not be the best way to implement ldr rendering but it works for my requirements.  Remember that the camera placement noted in this script moves the camera to frame a Rainbow Lego Tower on Brickalo - for your model it will be different!   Also the camera target (where the camera looks at) will also likely be different.  I found controlling the camera framing and the camera target using ModoCL hard - I've spent quite a bit of time trying to convert a POVray camera to a Modo camera but to date I've not succeeded working out the maths to do the conversion reliably.

Create a "brickalo" folder in your home directory then either download the zip file above or create a file called brickalo.txt and copy and paste the code below (and you'll need your own myLegoFile.ldr too)...

#======================================================================================================================================
# BRICKALO MODO RENDER BY NEIL MARSDEN 2018
#Make sure both MODO and the LDRAW Plugin for Modo is installed
#Currently an LDRAW folder needs to be in C:\LDRAW Modo_CL does not see the LDRAW location set for the plugin in Modo
#But you still need to load the config file so that Modo_CL knows where the LDRAW plug-in is

#In the comand window copy and paste the following line - BUT MAKE SURE YOU CHANGE UserName to your UserName so mine would be "C:\Users\Neil\brickalo\brickalo.txt"
#"C:\Program Files\Foundry\Modo\11.2v2\modo_cl.exe" -config "C:\Users\UserName\AppData\Roaming\Luxology\MODO11.2.CFG" < "C:\Users\UserName\brickalo\brickalo.txt"

#Lots of people have this at the start of their modo scripts!
log.toConsole true
log.toConsoleRolling true
#=========  Open LDR File ==========
scene.open "C:\Users\UserName\brickalo\myLegoFile.ldr"
#=========  Move the Camera ==========
camera.transformTo Camera -0.228601471 1.172085693 -0.844499451 0 0 0 
#========= Create Mesh - this will be the camera target ==========
item.create mesh
item.name "cameraTarget"
transform.channel pos.X 0 
transform.channel pos.Y 0.175 
transform.channel pos.Z 0 
#========= Target Camera ==========
#Select the Camera then the Mesh then point the camera at the Mesh
select.subItem Camera set
select.subItem cameraTarget add
target set
#Changes the field of view (zoom)
camera.hfov 22
#========= Start Image Render ==========
select.Item Render
item.channel step 1
item.channel first 1
item.channel last 1
item.channel outPat "_<FFFF>"
#========= Render HD Landscape Resolution ==========
render.res 0 1920
render.res 1 1080
#========= Output the images BUT MAKE SURE YOU CHANGE UserName to your UserName! ==========
render.animation "C:\Users\UserName\brickalo\OutputImage" PNG
#========== Or render a turnaround animation - rem out the previous line and use this next line instead (remove the hashtag) - BUT MAKE SURE YOU CHANGE UserName to your UserName! ==========
#render.turntable "C:\Users\UserName\brickalo\OutputMovie.mp4" pyFFMPEGMP4 24 12.0 0
#WORKS?!

Sunday, 4 November 2018

Playing Lego With Python - www.brickalo.com

So I've taken a break from developing the python code for tracking and adding Lego bricks to an .ldr model file so that I could turn my current code into a website which would help to display some of the ideas that I've been working on.   The result is www.brickalo.com


I've tweaked the colour allocation of bricks so that it creates a "rainbow" effect as the bricks are added to the pile and I've used some of the other work I've done in Modo to create a command line renderer for each Lego pile so that you end up with a pretty picture of your pile of Lego - I used Mobirise to create the basic bootstrap website - Mobirise is free and allows you to create a static bootstrap website really quickly and easily but I then had to switch to PHP to create the dynamic code for the website (the "WOW BRICKALO" gallery section on the home page and the timeline elements on the Archive page).  Working in PHP was slightly weird having spent so long in Python, but the main structures are similar so coding the dynamic elements was not too complex. 


The whole site is hosted on Amazon's AWS free tier and whilst in isolation www.brickalo.com might seem a bit weird; as a method of displaying the work I've done - mostly on my commute to and from work over the last nine months, I feel it works well and I'm really pleased that it's drawn together a number of different strands that I've been working on over the last year.

Saturday, 3 November 2018

Playing Lego With Python - Pile 'Em High...

With the Build Matrix now functioning correctly I could increase the number of bricks that I could add to my pile hopefully without experiencing any intersections.  I set the total number of bricks to 100 and pressed "Go"...


Not too bad!  Analysing the model I was fairly certain it was a valid model - that is, that every brick was connected to another brick by at least one stud and there were no intersections or "floaters" (bricks that hung in space and were not connected to any other brick).  If I imported my model into Lego Digital Designer (LDD) - LDD would generate an error and tell me how many bricks were incorrectly placed...My Lego tower imported into LDD with no errors - so I created a couple more towers and imported those too...


LDD reported no errors for any of the piles (phew!) - it looks like the changes I made to the build matrix seem to be working.


Having created a mechanism for adding a variety of Lego bricks to a model in a valid (if somewhat unstable configuration) could I now get the code to start to create more visually interesting models and designs.  


Friday, 2 November 2018

Playing Lego With Python - Improving The Build Matrix

Managing the addition of both rotated bricks and "odd" bricks like 1x2 and 2x3 required me to rework the "Build Matrix" that I use to track the placement of bricks as they added to the ldr file.


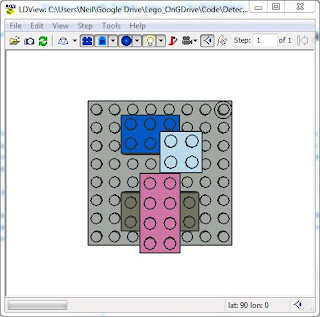
You can see the build matrix in the image above on the left (along with the ldr file and the ldview image.  This tracks each brick as it's added to the .ldr file and calculates the studs and dimensions of the bricks.  This allows the code to track the placement of each brick as it's added to both the .ldr file and the build matrix. 

I also re-orientated the build matrix so that it matched the top view - this is where the single red stud buried in the top right hand corner of the model became important as it provided a reference point on model that I could match to the matrix - and the stud is buried in the plate so as not to effect the actual build matrix itself.


The problem I had was in the mechanism I used to calculate the addition of the new part to the build matrix - once I had reworked that calculation, the build now matrix accurately reflects the placement of bricks in the ldr file.  However, if you look carefully at the build matrix you can spot that the build matrix only works by moving the bricks up in height (look at the matrix values for the bottom two "floating" pink studs) - there is currently no option to "back-fill" into holes.  This should be possible by combining the build matrix and the data stored in the ldr file so that you could also map the "holes" between bricks that might exist in a model.


With the build matrix now accurately reflecting the addition of parts which had been rotated, or were "odd" bricks (or both!) I could now consider building much taller towers hopefully without any placement errors.


Thursday, 1 November 2018

Playing Lego With Python - Rotating Bricks During The Build


Whilst brick rotation is relatively straight forwards (by modifying the rotation matrix for each brick in the ldr file) tracking the corresponding rotation in my build matrix (which tracks brick dimensions and stud availability of bricks in the pile) is complex.  As you rotate the brick you have to rotate and reshape the brick matrix by the same amount.


Although the Lego piles were increasingly "correct", that is to say that any new bricks sat on top an existing stud if one was available in its proposed position there were still occasional problems in the build matrix.  I realised the problems seemed to limited to specific bricks (mainly "odd" flavour bricks like 1x2 and 2x3 bricks and plates) - the placement of these "odd" bricks is trickier as the origin point of the bricks in ldr brick placement does not place "odd" bricks on a stud by default, so they immediately need moving to sit on a stud.  This initial move and any subsequent move needs to be tracked in the build matrix and then also tracked when these bricks were rotated.


Consequently I've had to learn a lot about matrix manipulation!